This will be a guide to take apart and somewhat understand Ogg Media (OGM) and Matroska Video (MKV) files with the aim of adding hard subs-- subtitles embedded into the video itself-- to an easily uploadable Audio-Video Interleave (AVI) file. My aim is to minimize the software used, and so we will stick with VirtualDubMod 1.5.10.2 for the actual video de- and re-encoding, and the VobSub 2.23 filter to embed the subtitles.
The following tools and instructions should work for both OGM and MKV filetypes.
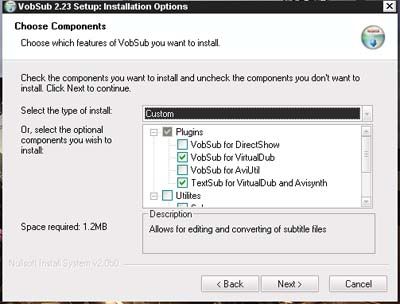
First, you must extract VirtualDubMod to a folder. I also made a shortcut on my desktop to the executable, for easy use. Next, we need to install VobSub. Make sure that you have both "VobSub for VirtualDub" (this is for non-text-based subtitles) and "TextSub for VirtualDub and AVISynth" (for text-based) selected.

Select the directory you extracted VirtualDubMod to and we're set.*
Demultiplexing...
Now, we open VirtualDubMod and click File->Open video file. Find your file and click 'Open.' The first thing you'll want to check out is Streams->Stream List.** From viewing your video on VLC you should have an idea of what steam matches to what.

The major difference we need to know between AVI, MKV and OGM is that AVI uses mp3 audio and MKV and OGM both use Ogg Vorbis, so we'll need to convert to mp3.
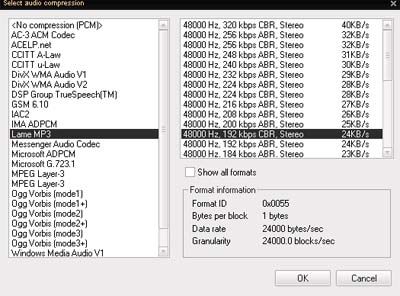
Right-click on the audio track you want to include with the video and choose 'Full Processing Mode.' Now, right-click on it again and select 'Compression.' We want Lame MP3 compression, with constant bitrate (easier on compatability issues). Click OK.

Now, click the button 'Save WAV' and choose a filename. Don't worry that it says 'WAV', just make sure to include the MP3 extension (for example, 'myaudio.MP3') and you'll be fine. This'll take a minute because we're converting ogg to mp3.
Next, click on the Text Stream from the Stream List window and click the 'Demux' button, choose a filename, and click Save.
From the 'Video' menu click on 'Direct Stream Copy.' This takes the video part of your OGM/MKV as is, with no audio/subs. Click File->Save As... and choose a filename-- make sure AVI is selected. Well, now we're all finished taking 'er apart.
Multiplexing...
This is the time-consuming bit.*** Close and re-open VirtualDubMod, then Open your recently created AVI file from the above steps. Go into Streams->Stream List, but this time it's empty. Click the Add button and find your recently created MP3 file.
Now to hard-embed the subtitles. From the Video menu, choose Filters. Click Add and find 'TextSub 2.23.'

Now open the SRT file you created earlier.**** Click the Styles button and make sure the subtitles are going to appear to your liking.
We now need to go to make sure that Full Processing Mode is enabled from the video menu. It should be, but if not then just click it. Click Video->Compression, then choose XVID.
We're done. All that's left is to let VirtualDubMod chug away for a bit. Click File->Save As***** and choose your finished filename as an AVI. I find recompressing with the XVID codec reduces filesize (with very minimal quality loss) to about 30% of its original size. This helps for upload times.
Some thoughts on some uploading sites...
Veoh, I find, has the strictest copyright detection. Try not to upload movies here, unless you chop them into pieces. However, there is no timeout and a 2GB size limit to your uploads. Veoh gives a decent representation of your video, but somewhat digital looking.
Megavideo's copyright detection doesn't seem too aggressive, but you may notice your account getting removed every once in a while. Also has no timeout and a 5GB size limit. I find Megavideo's video quality to be poor, with heavy blur and pixellation.
Imeem's copyright detection is on par with Megavideo, these days (as far as I know). There is no size limit here, however your uploads have a timeout (somewhere between one and three hours). Imeems quality is the best, with surprisingly accurate reencodes of your uploads.
Notes:
* After completing the install of VobSub, I invariably have the installer freeze. This is fine, just hit Ctrl+Shft+Esc and force-quit it.
** If you just need to switch the audio defaults around, here's where you do it. Use the Move Up and Move Down buttons, and click on the Speaker button to enable a stream on by default. Then File->Save As.. OGM/MKV and you're set.
*** I highly recommend the check-box that you'll notice on any Save window saying "Add to Job Control so I can run it in batch mode." You want this for processing multiple files. Check it, and continue along, then when you're ready to process the whole batch, go File->Job Control.
**** For some reason, when I demux using VirtualDubMod I can't open the SRT file right away. One workaround is to open it in notepad, copy all the text into a new text document and rename it to SRT. If you find a better workaround, please tell me.
***** If that was too much clicking to repeat for twenty-some episodes, at this point it's okay to start making a script. If you go File->Save Processing Settings, all your current settings will be saved. Then you can edit the VCF in a text editor to your own needs. You may delete the line VirtualDub.video.SetCompData. The only additions you'll need to make are VirtualDub.Open("C:/My Files/yourInputVid.avi") and VirtualDub.SaveAVI("C:/yourOutputVid.avi"). Note the forward slashes. Then copy-and-paste for multiple episodes, and edit as necessary. Sorry, no flow control in this beautiful scripting language. File->Run Script will execute your script. Here is a sample script.


